
How to Make an Android App in a Few Days, Part 1: Getting Started

So you want to make an Android app. You’ve heard from people like me that making websites or mobile apps is an easy way to start coding, or just to make some money on the side to be able to do all the things you’ve been wanting to do. I’ve got good news for you: it’s true!
Making Android apps is one of the easiest and most accessible methods to live that life you really want to live. No crazy work hours, plenty of demand, and the ability to make real, steady money, working from anywhere. But where do you start? You might love the idea of making some easy money on the side, but not really have a passion for coding (or computers in general); you might be a bit overwhelmed by the prospect of making an app. If that sounds like you, then this article is for you.
Making an Android app is extremely easy, the key (as in all of programming) is to not overthink it. Keep this in mind always, there are 2 things you should think about when coding:
What do I want to create?
How do I get there?
If you’re an entrepreneur for example, this might sound familiar to you: the trap of overthinking something. There is almost always an easy answer to those two questions above, and anything else is not worth your time.
With that in mind, we’re gonna create a calculator app as quickly as possible. It should be able do these things:
Accept two numbers from the user,
Add those two numbers,
Show all of this, and the result, to the user.
Sounds simple? That’s because it is! We don’t want a coding masterpiece, we want to get something done quickly. Now, how do we do this? That’s where the fun begins!
Making the app
I’m going to show you, in a few steps, how to create a fully functioning Android app.
Step 1: Download Android Studio

Android Studio is an IDE used for Android development. Think of an IDE as Microsoft Word: just like Word helps you write with tools like autocorrect, thesaurus, etc., so does Android Studio with making Android apps. Writing an Android app without Android Studio is like writing an essay without autocorrect and other tools: painful.
Head to https://developer.android.com/studio to download Android Studio.
Step 2: Create a New Project

After opening Android Studio, you will see a popup that looks something like this. Click on “Start a new Android Studio project”.

At this point, we have to understand a bit about what an activity is. Every app uses the concept of “screens”: when you login, you’re on the login screen. In Android, these screens are called activities. Think of an activity as a graphic that takes up the whole screen. Examples are a login screen, a screen containing a list of emails, an app’s homepage, and many more.
In our app, we will only need one activity (one screen): the one where the user can put in numbers and make calculations with them. For now, let’s choose empty activity as we will be adding things later.

This screen is mostly irrelevant for us: no need to change too much here, except changing the name to something like CalculatorApp.
Note: We will be using Kotlin in this tutorial. Kotlin is the programming language we will be writing in, same as I’m writing text in English right now. You might have heard of Java, the programming language: It can also be used to write Android apps but Kotlin is a much newer and cooler language, and has pretty much taken over. If you want to pursue programming, I strongly suggest you learn Java. While being somewhat arduous, it’s just the best language for learning the fundamentals of programming. If you just want to make something, then this choice won’t matter too much right now.
Click “Finish”!
Step 3: Understand what’s in front of us
Boom, we’ve created our very first Android project!
Chances are, you're met with this unbelievably confusing screen. So many options, so many buttons, where to start? If you have no problems navigating this, then that’s great! If this looks like it’s straight out of an 80s hacker movie to you, then don’t worry, it’s not as complicated as it looks.

Right off the bat, there are many buttons that we can blissfully ignore: namely, all of the ones on the top right and bottom right of the screen. We won’t ever need most of them.
What’s really important is what’s in the middle and the left. Let’s start with our project structure:
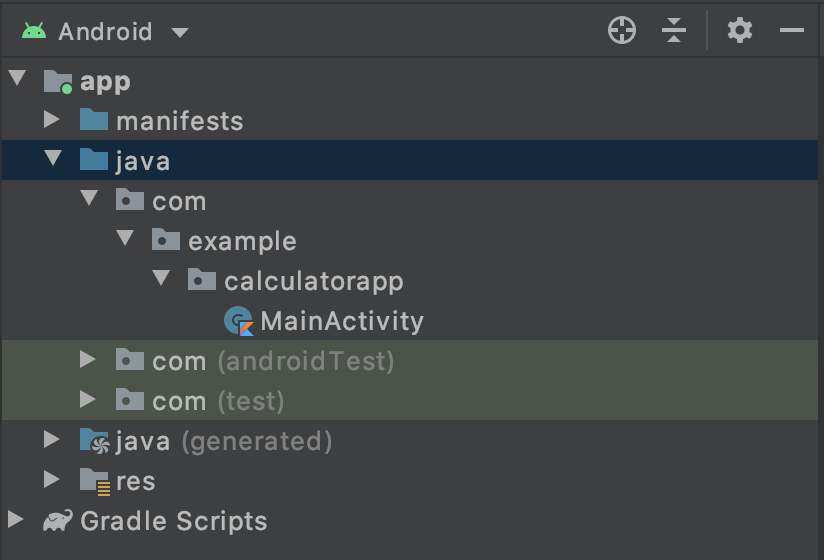
This is just an overview of all the files in your project. Think of this as Android Studio’s version of Finder on Macs, or Windows Explorer on Windows.

Good old windows explorer.
The second and last part of your screen that you should be interested in for now is also the largest part: It’s the window where we can see our code.

Here, you can open any files you want and see what they contain.
Summary
And that’s all you need to get started! By the end of this article, we should have:
Downloaded Android Studio,
Created a new project with a name,
Opened our project and seen our first bit of Android code.
Let’s take a quick break, and then move on to making something that you can actually see and use on your own phone.